This post may contain affiliate links, meaning I get a commission if you decide to purchase through my links, at no additional cost to you. As an Amazon Associate, I earn a few pennies from qualifying purchases.
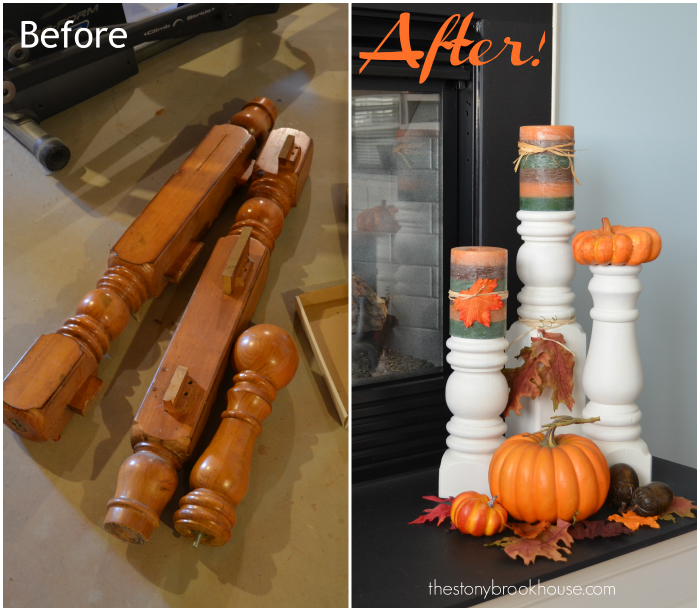
Who would've thought you could make candlesticks from bedposts.
These have been lying around in my basement for a couple years. Lying just like that, too, they haven't moved.... One of our tenants left them when they vacated their apartment. I figured I could do something with them. I didn't have the heart to throw them away.
But lately, I've had this bug...to purge!! Each week on trash day, I decided that I must throw SOMETHING away. I was staring at those bedposts and considered walking them out to the trash. This is the conversation I was having with myself... "Lori, these have been lying around like this long enough, if you don't do something with them NOW, you are going to have to pitch them." So, that got my butt moving and sparked this post.
This basement is a mess! I can never seem to stay caught up with this. One day I'm hoping to have this place organized and stay organized! That's really the key.... I'll spend time cleaning it up, and then slowly but surely, things just miraculously start piling up again.
But if I continue with this purge thing, there may be hope for me yet! I gotta get rid of that printer... it doesn't even work! More stuff to the trash!😁
Apparently, the bedrails were sawed off of the bedposts and disposed of. So, the first thing I needed to do was to remove the remaining supports, as you can see by the arrows.
I removed the screws and tried prying one off. As you can see, that didn't work so well.
So, I got out our Multitool to cut the rest of it off. That tool is amazing! It practically cuts through anything!
That worked a lot better! It cut them off like butter!
Here are the posts cut up. I cut the ball off the top of the other bedpost. I "say I", but what I really mean is hubby. I don't feel too confident with the table saw yet. I really like his supervision. For this project, he cut everything for me. Plus these pieces were awkward to cut, because they didn't lay completely level. I love that he's so willing to help me! He's great like that!😍
I wanted one of the bases cut in half. Thanks, hon!
Now look! I have candlesticks! And the sizes stagger just perfect. 😊
Now, it's time for some primer and some paint. I used my favorite Zinsser Bulls Eye Primer which sticks like glue to anything!
Then I use my handy-dandy DIY Chalky Paint Recipe. I gave them about 2 coats. They look kind of yellow in this lighting...that's what happens when you try to take pictures when it's dark.
As you can see below, they're not yellow at all. Here's what they look like on my fireplace. I guess I have to break out my fall decorations.
Oh! Don't they look so fallish?
I guess I'm going to have to put away my Summer Coastal Mantel. 😔 I'm really dragging my feet on this fall thing. I just don't want it to get cold. But, it's time to move on... Maybe I'll break out the decorations this week... or next week...
Blessings!


No comments
Post a Comment