OMG! This was too much fun!! I stayed up late last night finishing this!
I already love how organized it makes me feel!
Remember these??
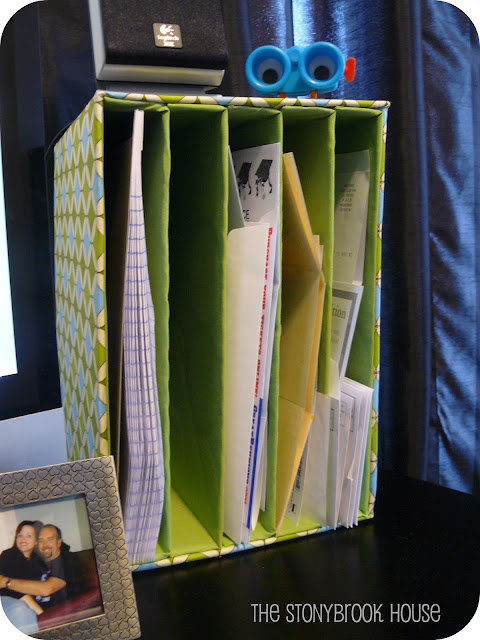
They turned into this!!
Many days our desk looks like this!
(Minus, of course, the adorable new mail organizer)
I want it to look like this!
Now, I am blessed, because my wonderful hubby takes care of all of the bill paying : )
He wasn’t too sure about this idea.
He likes the way he’s been doing things, since he pays the bills…
Yet, I pleaded and assured him, let’s just try it and if you don’t like it, no big.
Well, when he saw the final result… He LOVED it!! Yay!!
Before our handy dandy mail organizer all of the mail/bills/ junk mail
went into one BIG pile!
Which would set me on edge just a bit….I am a Type A personality
and I really like things organized and orderly, at least I REALLY like the illusion
that we are organized and orderly….
So, now all the mail has it’s own slot. The next part is to somehow put little labels on it.
I’ll have to think on that one…
Here’s how it was done! Mind you for ONLY $2!!! Now that’s cheap!
First, I started out with boxes. Free at the grocery store!!
You just have to cut the one side off. I just used a regular ole box cutter.
I had this lime green sheet, I got at a yard sale eons ago!
So, I’m gonna call that kinda free too.
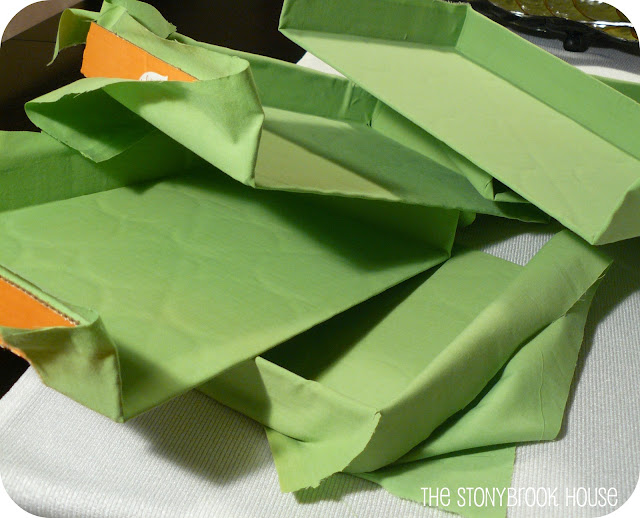
I cut it up to cover the “mail slots”.
I just used spray adhesive to glue the fabric on.
Then, I just trimmed the edges, done!
Well, I trimmed them after I took the picture....
Now, you need to create the frame that houses all of your mail slots.
I measured the length and width of my mail slots and
found a box that would fit around them.
Free again!! I measured and cut out 2 of them.
I found this cute fabric at Hob Lob on clearance!!
$4 a yard, I only used probably a ½ yard.
I covered both frames.
I also added the green fabric on the inside of one of the frames so it looked uniform on the inside. Darn, I forgot to take a pic of that step...sorry.
Now, it’s time to glue the mail slots to the frame. I used a glue gun for this.
I wanted it to be solid and sturdy.
Start by gluing the back of one of the slots first,
then "stand" it up and glue the bottom.
Glue them all down.
Then wrap the other frame and glue those ends down.
Where the 2 frames meet, I just folded the fabric over and glued it.
The back has some extra fabric, I just folded it over and glued that as well.
Ta Da!! Done!
You can turn it sideways also.
There are sooo many things you can use this for.
Sorting mail, craft paper, file folders, etc....
Now, it took some time, I think this one took about 2 ½ to 3 hours, but basically free!!
I was in an office store just the other day looking at organizers.
I couldn’t believe how expensive they were!
So, not only was this a cheap one,
I got to decorate it with the colors I want in the office!
I love that little guy, do you remember him? Isn't he from Toy Story??
I can't remember...
I'd have to say this project turned out Fantabulous!!
I’ve got another project for the office brewing….
Blessings!


This is so cool! I love that you used items you already had...and it looks like you spent a lot. Not $2! Can't beat that price!! Great job! :)
ReplyDeleteThanks Beth! I love cute and cheap altogether!!
ReplyDeleteLOVE this! I am going to feature this at my linky party tonight so make sure you come by and grab a featured button! Have a great day!
ReplyDeleteAmy@homehappyhome
Awww! Thank you, Amy! I'll definitely stop by!
DeleteI love this idea! I did a "cereal box organization" that I hung on the fridge...but, I'm loving this idea for a mail sorter. Cute fabrics...AWESOME JOB! Now following you!
ReplyDeleteErin
Isn't it fun finding ways you can use things you normally would throw away? Thanks so much for visiting and following!!
DeleteI love this organizer! So cute.....
ReplyDeleteQuestion though: Where did you get the LAMP??!!?
Hahaha! Carrie, I was thinking...What lamp? Then I saw it.... I got that lamp a couple of years ago at Target! I love the damask print! Thanks for stopping by!
DeleteThat is super cute. I just love that fabric. You did a great job. Thanks for sharing at DIYbyDesign.
ReplyDeleteThanks, Judy! I appreciate your kind words! My pleasure in sharing at your party!
DeleteI am following your site, and love many of the things you doing:) Ypu are so good.
DeleteThanks Pia! I'm glad you stopped by! :D
DeleteThank you, Jill, still working on that office.... It'll get there! I love sharing on your blog. It's such a cute blog! I'll definitely be sharing again!!
ReplyDeleteI love this idea- will be trying it! Following you and looking forward to seeing the neat things you do.
ReplyDeleteAwesome, Sarah! I absolutely love mine! That is so sweet of you to follow me. Thank you for the kind words and for dropping by!
DeleteHey! Just a note to let you know that I featured you on Jillify It!!
ReplyDeleteJill
www.jillifyit.com
Thank you sooo much for the feature! Thank you for hosting a great party!
DeleteThis turned out great! I love the colors and fabrics you chose.
ReplyDeleteSwapna
frugalistastyle.blogspot.com
Thank you, Swapna!! I love that it was practically FREE!!
DeleteThis turned out so good!! I need some way to make my billing easier! Thanks so much for sharing on Six Sister's Link party! Hope to see you again!
ReplyDelete- The Sisters
It really has helped us be more organized! Thank you for your sweet comment! It was my pleasure to share!
DeleteI love so many aspects of this project. It looks great, I love the colors, I love that it's free. Thanks for sharing at Terrific Tuesdays.
ReplyDeleteRachel
adventuresofadiymom.blogspot.com
Thanks so much, Rachel!! It was my pleasure to share! Love your blog and your party!!
DeleteBlessings!
Perfect!!! You go such a great job of making simple everyday items useful and extraordinary! I think I need one of these. My husband does most our "household paperwork" too, and it's usually sitting all over our office shelves....drives me bonkers :)
ReplyDeleteThanks for linking it!
--Katie
Thanks, Katie!! It really has helped keep us organized. It was my pleasure to link up!!
DeleteGreat project...very innovative. Can't beat the price for something that is functional AND pretty. Congrats on the feature at Creatively Living.
ReplyDeleteSharon @ mrs. hines class
Thank you so much for the sweet comment! I LOVE Cheap and Pretty!!
DeleteNice! Way to use what you had and recycled, love those DIY projects! Is it sad that I wish I received more bills so I would need to sort them? Haha! Will probably do something similar to organize papers, though, as in printing paper, lined paper etc. I'll keep an eye out next time at the grocery store for good size boxes like these. Thanks for sharing.
ReplyDeleteThanks, Gen! I think we receive more credit card offers than anything else... Well, I'm sure there are plenty of bills in there too.. the organizer can be used for so many things!
DeleteI appreciate your kind words!
So easy and so cheap -I LOOOOOVE it! Thanks so much for sharing.
ReplyDeleteIt was my pleasure to share! Thank you, Megan!
DeleteMail does just seem to expand to fill whatever space I allot it, so I love this idea. It's organized, maybe even my husband would sort the mail:)
ReplyDeleteJessica
stayathomeista.com
Thank you, Anne! I love your blog! I appreciate you asking me to share! I just did!
ReplyDeleteBlessings,
Lori
Hi Jessica! Mail sometimes feels like laundry and dishes... it just keeps piling up! Hahaha! Thanks for commenting!!
ReplyDeleteI love this organizer. Very useful and chic addition to your office room.
ReplyDeleteThanks, Amy! What's even cooler, is that we actually use it!!
DeleteI LOVE this!
ReplyDeleteHi Heather! Thanks! It really is useful!
DeleteYou are so smart! That is such a creative project, and it turned out so great! Thanks for the clear tutorial and for linking up @ Delectable Home.
ReplyDeleteHi Tisha!
DeleteThanks for the sweet comment! I especially love that we actually use it! It was my pleasure to link up!
Hi Aimee! Thanks so much! I appreciate the invite, definitely linked up!
ReplyDeleteWhat a creative idea you had in making this. Really came out great and so pretty. Love the pattern you choose. Love anything repurposed! Now I need to get organized, papers laying all over the place! Thanks for sharing your creative inspiration over at Sunday's Best.
ReplyDeleteThanks, Cathy! I LOVE to repurpose and recycle! I'm still not as organized as I would like to be...
DeleteWow I could definitely use one of these!
ReplyDeleteThanks for sharing at Beautify It Monday!
-Four Sisters
Thanks, Sisters! I think I could use a couple more myself...
DeleteNice.. I pinned it! :) Thanks for linking up at friday fun party.. I love such ideas..
ReplyDeleteHi Hani! Thanks! It was my pleasure to share!
DeleteI love this! Thanks for linking up!
ReplyDeleteThanks, Lauren! It was my pleasure to share!!
DeleteThat is adorable! I'm staring at a pile of mail on my desk and thinking I need to make one! I would love for you to share this (and any other creations) at Pin It and Win It Wednesday at "Pin It and Win It Wednesday" @ www.cheapcraftymama.com!
ReplyDeleteThanks! I still have mail on my desk.... I think I need another one!! Thanks for the invite!
DeleteThat is a great idea. It looks so pretty!
ReplyDeleteThanks, Nicole!!
DeleteI found you on Freedom Fridays. What a great idea. I am a recyclaholic myself and have a few of these lid that I just can't seem to throw away. Now I know what to do with them. Feel free to stop by and say hello sometime. Have a great weekend!
ReplyDeleteHi Kathi! So glad you stopped by! You have an adorable blog!! Thanks you for your sweet comment!
DeleteHi Susie! Thank you for your encouragement! I'll definitely check out your party! Thanks for the invite!
ReplyDeleteThis is just too cute and simple but very clever. I (no joke) have been trying to find the perfect organizer at the right price but have been unsuccessful. Now I can design my own stealing your great idea:) Thank you for sharing at Freedom Fridays. Hope you have a super terrific week!!
ReplyDeletePS Now following via bloglovin!
DeleteHi Evelyn! Thank you so much! Steal away and enjoy! I'm so glad you stopped by!
DeleteI see this in my classroom, on my desk, on my student work table, in the teachers' lounge......
ReplyDeleteYou make me smile!! They are so versatile! Have fun!
Deletewow just love it,got to make i of them
ReplyDeleteThanks Marion!! I appreciate you stopping by! :D
DeleteLove the organizer! Will be sure to look for the spray adhesive next time I am at Lowes or Wal-Mart.
ReplyDeleteThanks!! I still use mine all the time! I love it!
Delete