

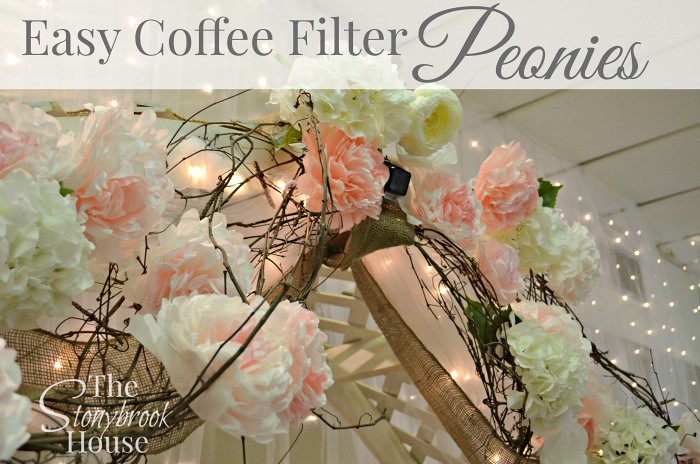
My daughter and I did all the decorating for this, I couldn't have done it without her help and designer eye. We make a pretty good team! We were even kidding about how we should go into business together!
I just love how the arch turned out! They had the arch structure and we decorated it for less than $30!

This post is going to be a bit heavy on the pics, but a very easy tutorial is included!
So, let's jump right into it!! Here are the folding steps to create beautiful full fluffy peonies.
1. Fold the coffee filter in half.
2. Fold in half again.
3. Fold in half again.
4. And one more time in half.
5. Then cut the top off in the shape of an ice cream cone.

See how pretty they look all opened up? Now, I'm going to show you how to get all these lovely shades of pink.

For a light pink only use a drop or two of red food coloring in a bowl of water.

For darker shades of pink use more food coloring. I went even darker for some of the filters.

For a darker edge to the petals you can color the cut edges with marker and dip into water. They come out so beautiful and make the flower look more realistic.
Next, you'll want some pipe cleaners for your stem. I chose white, because I didn't want the stems to show. Cut the pipe cleaner in half.

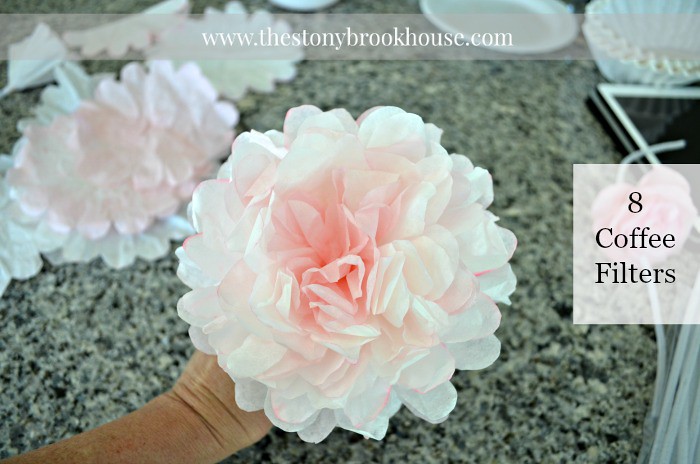
Pick out 8 filters for each flower. I suggest using different shades of pink. It really makes the peony flower look soft and realistic.
Poke the pipe cleaner through the center of the filter... Yeah, I know I'm repeating the directions on the picture.... :D

I wanted these flowers to be sturdy and no risk of them falling apart and I wanted them to dry fast. One tutorial said to use white liquid glue.... really? Who has time for that to dry???
Use a hot glue gun, you will be happy you did. It drys quick and creates a very sturdy flower.
Apply glue along about 1/2" of the pipe cleaner poking out.
(This was interesting trying to take the picture with my left hand..... :)

Then quickly pull the filter over the glued area, pinch it with your thumb and forefinger with a twisting motion. It was kinda hard to get that motion on camera.... You want to pinch the base, where the glue is.

If you look closely, you can see the pinched base of the flower.
Next, use the bottom of the pipe cleaner stem and poke through the next coffee filter and pull it up near the base of the first filter.

Apply glue from your hot glue gun all around the base the previous filter and pull the new filter over the glue and pinch and twist again. You will continue this same process for all 8 of the coffee filters.

This is the base I was telling you about. That end is very secure and is holding all of the filters together on the pipe cleaner.

I found eight filters to be enough for a fluffy full peony flower. This is what 4 filters looks like.

And here is 8 filters. It looks so full and fluffy!
Gorgeous! We mixed the "peonies" with some faux hydrangeas, it gave just the right romantic look. I also made a few coffee filter roses. Those were a bit harder, but complimented nicely.

One more look...
I'm so pleased that the bride and groom loved the way the wedding arch turned out! (Btw... do you see the little 'go-pro' hidden in there? :) It was a lovely weekend spent with friends and family! Hope you try these out. I'm thinking I should put some in a vase on one of my tables.
Blessings!

Fantastic idea, have an upcoming wedding and will definitely use these. D
ReplyDeleteI LOVE peonies, but they die so quickly. I might make some of these to go around the house instead of buying the real thing. Thanks for the tutorial!
ReplyDeleteHi Lori �� just came across your page. These are so beautiful ! I am going to try them out today ! I am a big time crafty perso amd especially love the easiness and cheapness of your idea ! I am a sponsor for my daughters prom so I have a few week left to gather some more decorations for prom. We are having an "Enchanted Garden" prom theme & class money is tight this year so making some if these woukd be perfect for all the decor we are going with ! We have lots of "woodsie" lol stuff goin on. Using mason jars, tea lights, vines, etc. Any suggestions or other pointers you could give me to whip some things out? I love suggestions and opinions ! Thanks for posting easy steps on the flowers !!!
ReplyDeleteHi Wendi! Awesome! It was so hard to even tell that these were made out of coffee filters. Sounds like the prom is going to be beautiful! Le me know if you have any questions!
DeleteBlessings!
These are fantastic! Do you happen to have a tutorial for the rose in the background of the how to photos? Sorry if this posts 3 times...im having issues lol
ReplyDeleteWe mixed the paper peonies with other faux flowers. They were ones we purchased. :) Thanks for stopping by!
Deletecan you tell me how many coffee filter flowers to silk you used?
ReplyDeleteHi Michelle! I used about 8 coffee filters per flower. Thanks for stopping by!
DeleteWow Lori! this is an awesome idea! I think I can even give them a twist and do sunflowers. Thanks for the tutorial.
ReplyDeleteGreat! I'm glad that you found it helpful! Hope your sunflowers came out great! :)
ReplyDelete