I can not believe how great these turned out! They were so cheap they were practically free, because I had almost all of the materials here at home. The only things I purchased was the outdoor polyurethane spray and one package of grapevine garland.
That little pumpkin on the ground is one of those faux carvable pumpkins. I bought that years ago and just repainted it. Anyway, I wanted to make a stacked pumpkin decoration for the front porch. But when I went shopping to look at pumpkins... I had sticker shock! For one of those big ones they wanted $30! Even with 40% off that's still $18. Then the medium sized one was $15 with a discount and the small one was going to be around $12. That's a total of $45 just for pumpkins. I wanted to make two of them for the front door. $90 in pumpkins??? NO! Not happening. I could think of a hundred other ways I'd like to spend $90!
Paper mache people!! That's what I did, then added on top of it a paper clay. I found this recipe for
paper clay. It worked fabulous! For the paper mache' paste, I just used flour and water and I did
not cook it. I read that the cooked method isn't necessarily stronger.
I started with this. Garbage bag, newspaper and masking tape.

I used the planter to get an idea of how big I wanted it.
Then I made a few more with any plastic bag on hand. Looks a little wonky...
Then I set to ripping strips of newspaper and got nice and messy in paper mache paste! They took a day to dry. We were having some nice weather, when I started these. I did two layers of the paper mache. Then made the paper clay and started on that. The middle one has some paper clay on it.
The paper clay took some getting used to. I made it too dry the first batch. I got the hang of it though, and used paper mache paste to smooth it out as I was applying it. You can see how bumpy it was here. Not really the look I was going for....
By the end I pretty much got it all smoothed out.
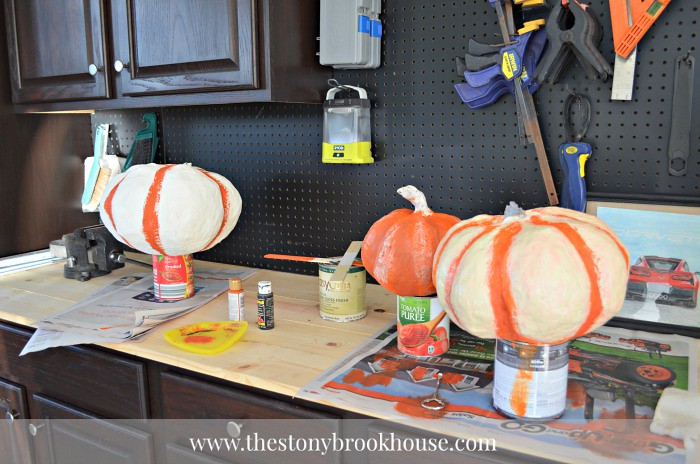
Not bad. Now for the paint. I wanted them to look like real pumpkins.
I'm no artist, that's for sure, but from a distance, they came out pretty good. :) I used all kinds of paint, interior latex, exterior latex, craft paint. I figured it didn't matter because I sprayed them all down with
Minwax 33260 Helmsman Spar Urethane
(FYI this post contains affiliate links. Regardless, I only recommend products or services I use personally and believe will be good for my readers.)
Next, I needed to figure out how I was going to stack them. I wanted them to be secure also, it get's pretty windy out there.
There is a plastic bucket upside down in this planter and I drilled a hole through it. I found this pipe in the shed, we used it for running electricity underground. It's a 1 in. plastic pipe. Then I cut a hole in a large garbage bag and placed that over the pipe and stuffed the edges inside the planter over the dirt. I just didn't want the pumpkins to sit in dirt or wet dirt. Then I went to making holes in the pumpkins.
I used a 1 in. drill bit just to get it started, then I rammed that screwdriver through. It worked! I did have to cut off a bit of the pipe for the last pumpkin.
Yay! Now for a little decorations and we're done!! I only used a bit. I wanted it simple.
I only paid about $3 for the grapevine garland at AC Moore. Plugged in my glue gun and got to work! Here's a close up.
So, what do you think? Pretty cheap, and pretty darn CUTE!! I love my front porch!
And....I made this super easy to disassemble and pack up afterwards. Check it out!
Each piece will easily come off and it will be much easier to store it for the next year.
I want to make another set, but I think I'm going to wait and see how well this one holds up to the weather. I'll definitely do an update at the end of fall.
UPDATE!! They did fantastic!! There was a tiny bit of mold between the bottom pumpkin and the middle one, but it cleaned up easy enough! Then I sprayed it again with the outdoor clear coat. Otherwise? Perfect! They look great out on my porch this fall (2015) :)
Oh, and as you can see, my
Painted Welcome Mat still looks amazing!!
Blessings,


What a great project, Lori! Your pumpkins look amazing...you did a wonderful job painting them. I do hope they hold up in the weather after all the work that you did on them. Thanks for sharing that idea with us.
ReplyDeleteVery very very cool! Great idea, because like you, I have a heart attack at the price of the fake pumpkins!
ReplyDeleteYou are an amazing craft lady ... Looks Wonderful...........
ReplyDeleteLori you outdid yourself once again. I would however change the wording "cheap" to something like inexpensive classic pumpkins. The cheap just doesn't do it justice. They are very classic. Btw Janine agrees too. Love you, Nana
ReplyDeleteLove it!! Just pinned to make next fall!!
ReplyDeleteI love this idea! Definitely one of my favorites on Hometalk! How could you use the same idea and make it work for Christmas? I think it's too late for me to get my act together for fall. :-)
DeleteDid you ever update as to how well these pumpkins stood up to the outside elements, because I wholeheartedly agree that the craft pumpkins are very expensive to do arrangements such as this -- or the Pooh Bear. Having the clay exterior should add enough durability to the paper mache. I was toying with the idea of using joint compound for durability and weathering the elements. Thanks for the idea!
ReplyDeleteThey are beautiful! I love doing crafts "on the cheap!" We all probably have newspapers and garbage bags. It looks like you brushed the paint on???
ReplyDeleteI love the grapevine wreath and silk leaves as finishing touches. You can use these for years to come!
Hi Barb! I love using things we "happen to have" around the house. I did brush the paint on. It just seemed easier. And, yep! I'm using it again this year! Thanks for stopping by!
DeleteYou did a great job. You know how one idea leads to another so could you have used a slightly larger pipe in the pot just long enough to come to the top of the pot and then run a smaller pipe thru the pumpkins (extending about 4 inches on the bottom pumpkin) and then put the smaller pipe in the larger pipe. When ready to remove the pumpkins you could keep the pumpkins together by removing them as a unit and wrap in plastic bag for storage. You would have to fasten the bottom pumpkin to the pipe that extends on the bottom only a few inches with a glue so when you lifted the bottom pumpkin the pipe in the pumpkins would stay in the pumpkins. I'm assuming the pumpkins are very light in weight. Next year you would only have to set the pipe back in the larger pipe and it would already be assembled and would save wear and tear on putting the pipe back through all the pumpkins. Not as complicated as it sounds.
ReplyDeletewonder if you could make snowmen the same way?
ReplyDeleteHi! Oh, I bet you could!! That's a great idea!
DeleteJust wondering if you had any trouble putting the pipe through all that newspaper and bag stuffing?
ReplyDeleteLove the project.